

how to add worldedit to minecraft
Table of Contents
- How to make a selection
All about setting positions and manipulating the world around you!
- How to copy paste builds
All about replication!
- How to use schematics
All about using uploading and downloading different builds to your server!
WorldEdit is an advanced and easy-to-use Minecraft map editor that allows full control and manipulation of your Minecraft servers world. Placing a large and repetitive amount of blocks all by yourself can be a tedious task. WorldEdit allows you to cut down on the time it takes to build large structures and helps automate the boring stuff!
WorldEdit allows easy world manipulation, trouble-free repetition of existing structures, terraforming, and much more. On top of that, it's extremely easy to learn and install!
How to install Worldedit:
Before installing WorldEdit, make sure you know what server type and version you're using to ensure you download the correct version of WorldEdit.
Note: If you're running the Vanilla server type, you won't be able to install WorldEdit without switching your server type to one such as Spigot. If you would like to switch your server type, you can find our Knowledgebase article on this here.
Installing Worldedit as a plugin
The process for installing WorldEdit is the same as all other Spigot plugins, and you can find our guide on installing plugins here.
You can find the official WorldEdit plugin download here: https://dev.bukkit.org/projects/worldedit
Installing Worldedit as a mod
For both Fabric and Forge, the mod installation process is the same across both modloaders. Just drag and drop the latest WorldEdit file for your version in the `/mods` directory. As this is a completely serverside mod, you don't need to install this on every client. If you've never installed mods to your server, we have an easy-to-follow guide for both the Forge and Fabric modloaders.
Basics of WorldEdit
WorldEdit is rather large and without a solid grasp of the basics, it can become very overwhelming and confusing. Let's start with the very basics of WorldEdit and learn what selections are.
Selections are the fundamental building blocks of world manipulation and allow you to define specific regions. Selections are made by establishing two points in the world. You can think of this as an invisible box holding the location and types of blocks within the defined region.
To define the selection, you can use the commands `//pos1` and `//pos2` at two specified locations. This will establish two different points at your current location. (Hint: You can check your current coordinates by pressing the F3 button)
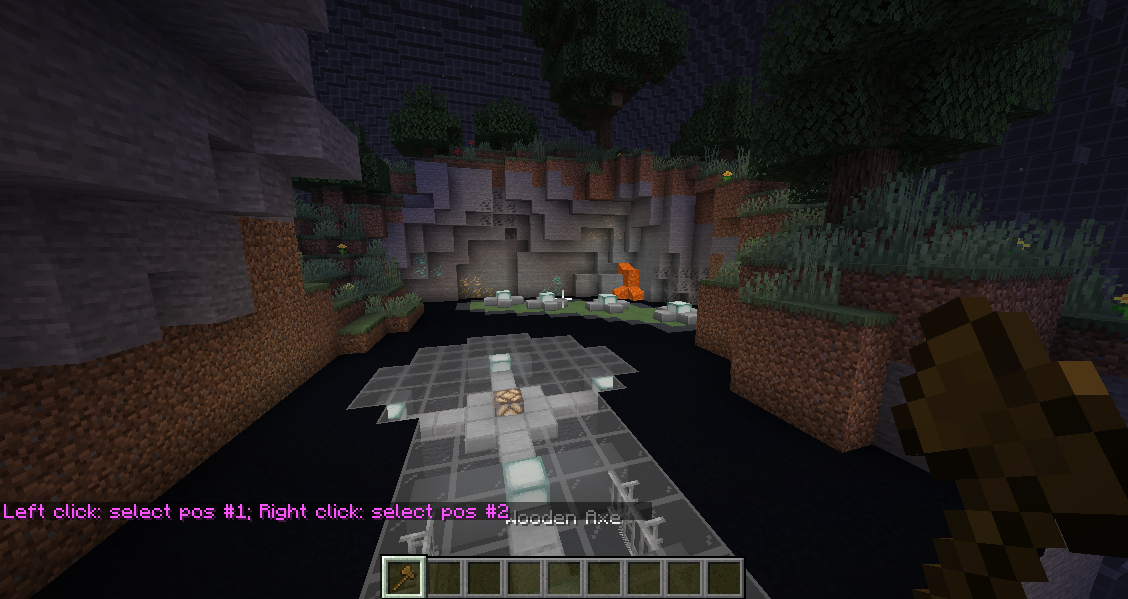
Aside from the `//pos1` and `//pos2` command, you can also run the `//wand` command to be given a wooden axe by default. The wooden axe is essentially the `//pos1` and `//pos2` command, except you just look at specific blocks and click to set positions. Just hover your crosshair over a block and press the left or right mouse buttons to set a position. If you'd like to set positions from afar, you can look at any block and run the commands `//hpos1` and `//hpos2`
NOTE: Remember that if you would like to use WorldEdit commands, you will need to set yourself as a server operator or configure a permissions plugin such as LuckPerms.
Once you've made a selection, it's really easy to manipulate it and set it to any block you want. For example, you might be wanting to build a bridge made out of wooden planks, you can simply specify a selection and run the command `//set planks`

NOTE: You don't have to use just one type of block. You can set specific parameters to have different weights on with blocks. You can find more information on how to use patterns in the WorldEdit documentation
WARNING: Making very large edits can cause lag and possibly damage your world. You should always take a backup before making any major edits.
Ever wanted to instantly terraform a desert into a plains biome? Simply make a selection at two specified points and run the command `//replace sand grass_block`. If you decide that you've changed your mind, you can undo your most recent selection by running the command `//undo`. Change your mind again! Just run the command `//redo`

If you'd like to copy structures, it's as simple as making a selection and running the command `//copy`. Once you do this, the selection will be in your clipboard and you can run the command `//paste` to paste this anywhere in the world. Please keep in mind that the build in your clipboard is relative to where you were standing when you copied. In other words, when you paste the build, it will have the same rotation and locational distance from when you copied it. If you would like to rotate the selection in your clipboard, you can run the command `//rotate 90` or `//rotate [any degrees specified]` before pasting it.

How to use schematics
Schematics allow you to easily save a section of your world or build to a file on your computer, which you can then share to your friends, online, or to another one of your servers or worlds.
You can create and download a schematic from your server by following these steps:
Creating and downloading
1: Ensure you have the WorldEdit mod or plugin installed on your server.
2: Make a selection and run the command `//copy`
3: Run the command `//schematic save nameOfSchematic`.
4: Browse to your server's web FTP directory. You can find this from your control panel under `Files > FTP File Access`
5a: Once you're in your server's directory, navigate to the `/plugins/WorldEdit/schematics/` folder.
5b: If you're running a Modded server, you can find this folder under `/config/worldedit/schematics`
6: In your schematics folder, you should see the schematic file which you can then download and share with anyone you want!
Uploading a schematic
1: To upload a schematic, first ensure you have the WorldEdit mod or plugin installed on your server.
2: Next, navigate to your FTP directory by navigating to `Files > FTP File Access` from your control panel. Some users find using a dedicated FTP client such as Filezilla to be easier to upload files, which we have a guide you can follow here.
3a: Once you're in your server's file directory, you can navigate to `/plugins/WorldEdit/schematics/`.
3b: If you're running modded, you can find this under `/config/worldedit/schematics/`
If there's no `../schematics` folder in your `../worldedit` folder, you can create a new folder with the same name.
4: Once you're in your `/schematics` folder, you can upload any `.schematic` file to your server. If you're using our WebFTP, you can press the `UPLOAD` button and upload any schematic file to your server. You can find new schematics on websites such as PlanetMinecraft.
5: To confirm you've successfully uploaded the schematic, you can run the command `//schematic list` in-game. You should see a list of all schematics in your schematics folder.
6: You can load the schematic to your clipboard with the command `//schematic load NameOfTheSchematic`. Make sure to not include the .schematic extension!
7: Once you have this loaded, you can paste this into your world with the `//paste` command.
More on WorldEdit
Now that you know the basics, you might be interested in knowing what else you can do with WorldEdit. For more information on the various features that WorldEdit offers, you can find the official documentation here: https://worldedit.enginehub.org/en/latest/
Some users also find that FastAsyncWorldedit tends to perform better on large builds. If you're interested in this, you can find the plugin download here or download FastAsyncWorldedit using our plugin installer.
If you require any further assistance, please contact our support at: https://shockbyte.com/billing/submitticket.php
how to add worldedit to minecraft
Source: https://shockbyte.com/billing/knowledgebase/277/How-to-install-and-use-Worldedit.html
Posted by: hendersonsomakingdon.blogspot.com
0 Response to "how to add worldedit to minecraft"
Post a Comment